Motion Planning with Tesseract
In this exercise we will fill in the appropriate pieces of code to create a motion planning pipeline using Tesseract. The end goal of this will be to implement a “scan and plan” application. Much of the code from the exercise is from our Scan N Plan Workshop.
Prepare New Workspace:
We will create a new workspace, since this exercise does not overlap with the previous exercises.
Disable automatic sourcing of your previous workspace in your
.bashrcif you had any.Note
This means you’ll need to manually source the setup file from your new colcon workspace in each new terminal window.
Source ROS 2 into your environment
source /opt/ros/humble/setup.bash
Note
If you are using a VM provided by us, please skip to step 7 as a directory called
tesseract_wsshould already exist with the dependencies already installed for you.Copy the template workspace layout and files:
mkdir -p ~/tesseract_ws/src
cp -r ~/industrial_training/exercises/8.0/template/. ~/tesseract_ws/src
Install the ROS 2 dependencies (this will take a while if you don’t do the shallow tag in the first one, but only do it for the first one)
cd ~/tesseract_ws
vcs import src --shallow < src/dependencies_tesseract.repos
vcs import src < src/dependencies.repos
vcs import src < src/snp_automate_2022/dependencies.repos
rosdep install --from-paths src --ignore-src -r -y
Install extra dependencies that aren’t properly caught
sudo ~/tesseract_ws/src/tesseract_ros2/.add-gazebo-ppa
sudo apt-get update
sudo apt-get install libxmlrpcpp-dev libgz-common5-dev libgz-math7-dev libgz-rendering7-dev -y
Initialize and Build this new workspace (this may take a little while)
cd ~/tesseract_ws
colcon build --symlink-install --cmake-args -DTESSERACT_BUILD_FCL=OFF
Source the workspace
source ~/tesseract_ws/install/setup.bash
Import the new workspace into your QTCreator IDE (if using QTCreator):
In QTCreator: File -> New File or Project -> Other Project -> ROS Workspace -> ~/tesseract_ws
Don’t forget to check the ROS distro and the build system!
Intro (Review Existing Code)
Most of the infrastructure for a ROS node has already been completed for you; the focus of this exercise are Tesseract custom pipelines and planner profiles. You will notice that many files and packages are already provided for you. You could run the application as is, but it won’t do anything intelligent and you may notice some weird behaviors. At this time we will explore the source code that has been provided. The following are highlights of what is included.
snp_automate_2022/config/workcell_plugins.yaml:This file contains all of the kinematic plugins and contact manager plugins for our application. A kinematic plugin configuration file like this is required to use Tesseract. Take a look at
workcell.srdfto see how it gets incorporated into the project.
snp_motion_planning/config/task_composer_plugins.yaml:This file contains the custom pipeline we will be using in this exercise. Currently, it is populated with very minimal pipelines. We will be modifying this file heavily to create increasingly complex and capable pipelines that enable solving difficult motion plans.
snp_motion_planning/src/planner_profiles.hpp:This file contains the planner profiles used to create our motion plan. The configuration of these profiles affect the behavior of the steps in our pipelines. Currently, only the Simple Planner profile is fully populated. This is one of the main files we will be editing in our exercise.
snp_motion_planning/src/planning_server.cpp:This is where our custom planner profiles will be used by our application. Take a look at the
createProgram()method. This method takes in the toolpath rasters and constructs motion plan requests in a manner usable by Tesseract. These motions include freespace motions, transition motions, and raster (process) motions. The order that they are added is the same order that they will be returned in.
Running the Application
Throughout this exercise we will always follow the same process for running the application.
Launch the application with verbose logging on to help with debugging:
ros2 launch snp_automate_2022 start.launch.xml
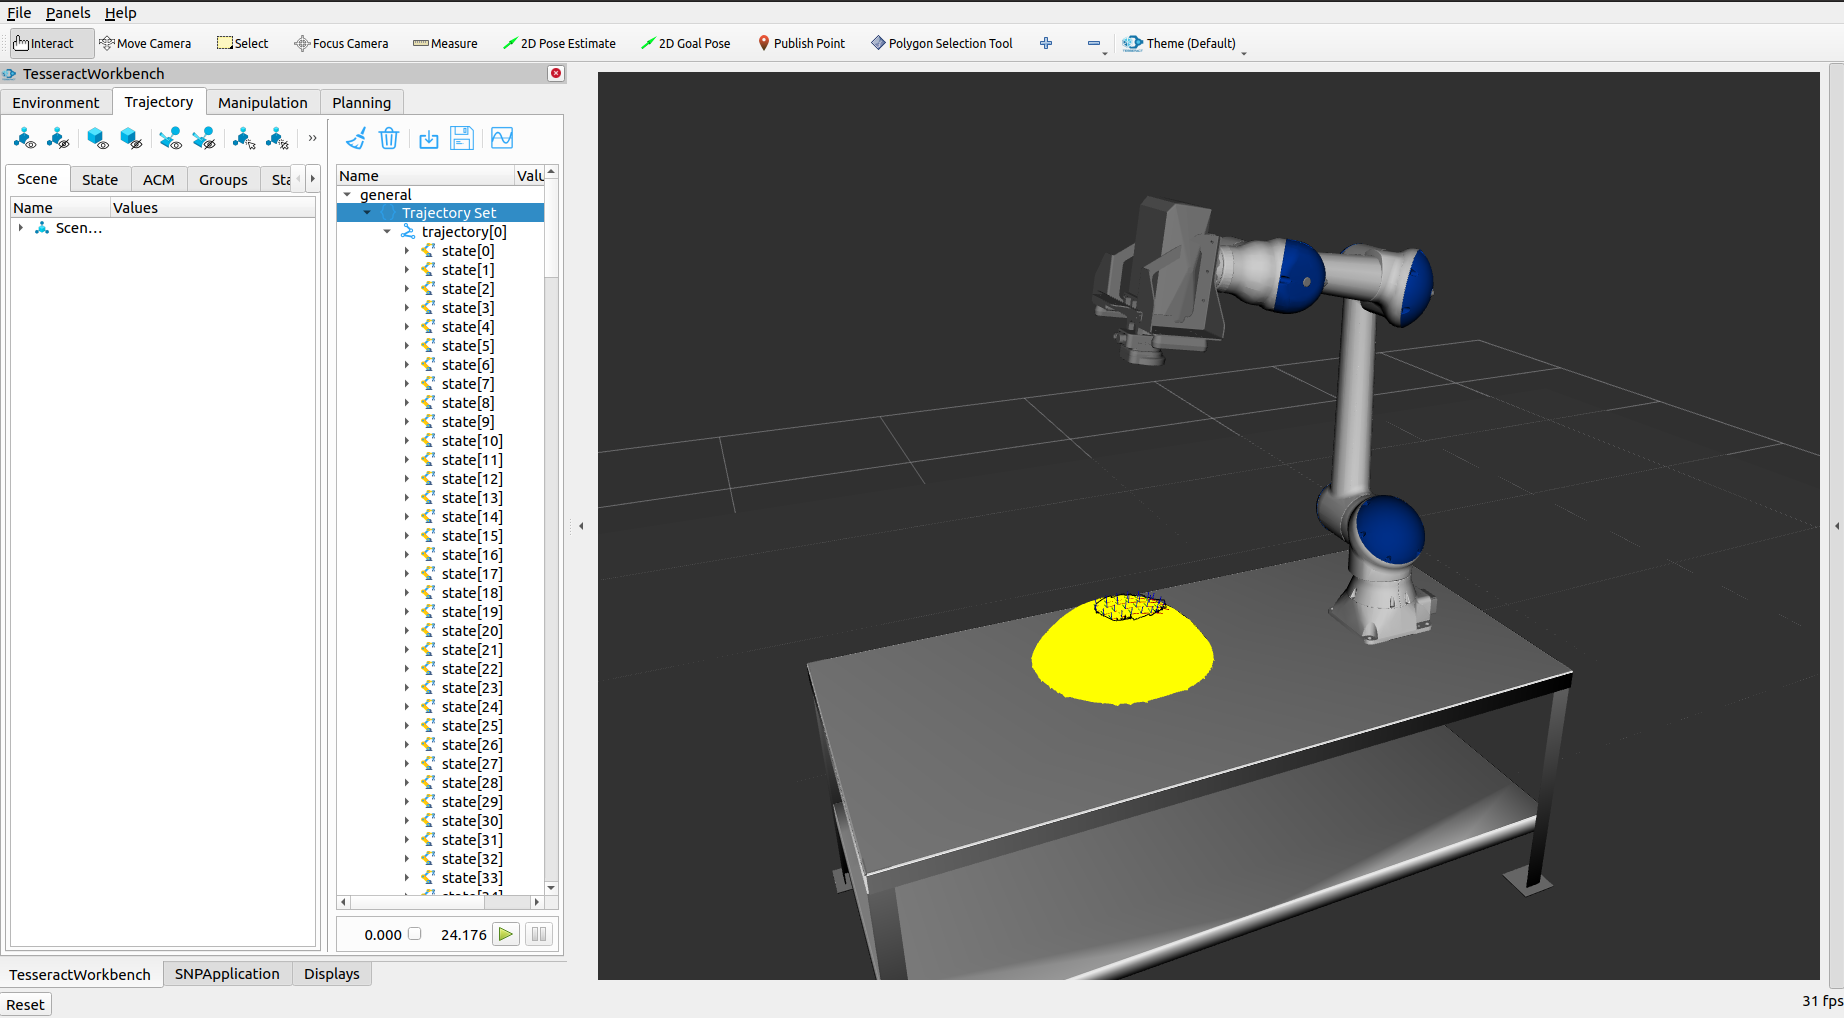
At this point you should see an RVIZ window pop up with an HC10 robot on a table
There should also be a joint_state_publisher_gui on your screen. Feel free to play around with it as well to create different start states.
Click the
Get Detailed Scanbutton to populate the mesh we will be running process motions onClick the
Polygon Selection Toolon the top row of RVIZWith your mouse draw a region on the yellow mesh where you want to process.
Note
If this area is too small waypoints won’t be able to be generated. Also, you can clear your drawing with a press of the middle mouse button.
Click back on the
Interactbutton on the top row of RVIZ to go back to normal RVIZ interaction.Click
Generate Tool Path Planto create waypoints. If no waypoints show up or you dislike your selected region try redrawing your area with thePolygon Selection ToolOnce satisfied with your waypoints click
Generate Motion Plan. At this point your terminal should start writing out many lines.Once motion planning is complete, if it is successful, you can see it by going to the
TesseractWorkbenchtab in the bottom left of RVIZ then theTrajectorytab and expose the items undergeneralby clicking the arrow. Clicking onTrajectory Setwill allow you to plan the planned trajectory and further inspection allows you to look at each individual step in detail.
To understand what exactly the pipeline did you can go to the
/tmpdirectory and open the following files:ScanNPlanPipeline.dot
SNPFreespacePipeline.dot
SNPTransitionPipeline.dot
SNPCartesianPipeline.dot
ScanNPlanPipelineResults.dot
Note
If you’re having trouble viewing these files install xdot with sudo apt install xdot
Fill in the Code
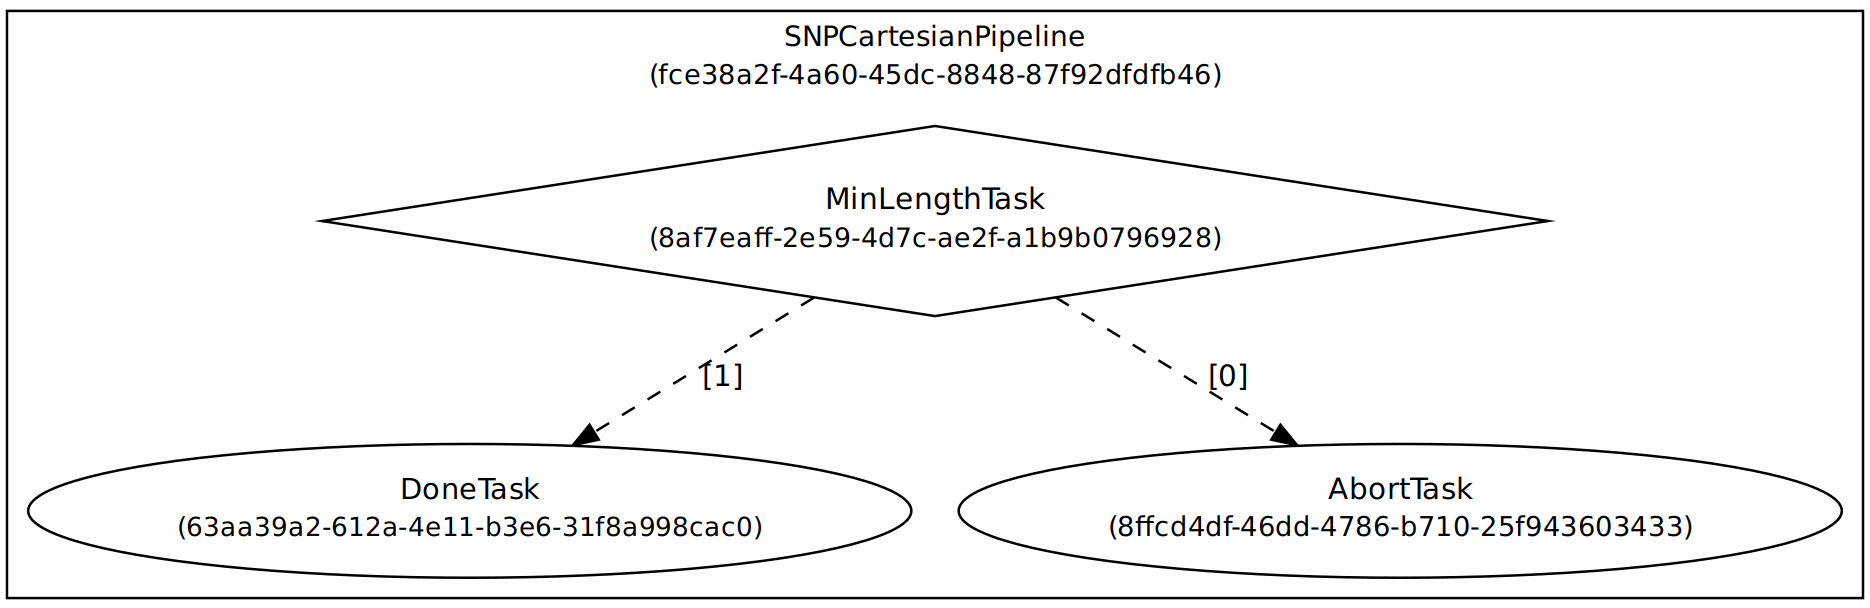
If you try and run the application right now you’ll get a successful plan, but right now it is just interpolated between waypoints naively. If you open the file /tmp/SNPCartesianPipeline.dot you’ll see that only one step was performed and it was just checking that the raster meets a minimum length.
Note
In this graph a 1 signifies success and a 0 signifies failure.
Let’s improve this pipeline by making it use Descartes when planning the Cartesian process motions.
Add Descartes to the Pipeline
Open the snp_motion_planning/config/task_composer_plugins.yaml file so we can add Descartes to the pipeline. Scroll down until you find the line that says SNPCartesianPipeline. This is the place where the pipeline resides that made that dotgraph you just looked at. If you look at the nodes field you’ll see exactly the nodes you see in the dotgraph.
nodes:
   DoneTask:
     class: DoneTaskFactory
     config:
       conditional: false
   AbortTask:
     class: AbortTaskFactory
     config:
       conditional: false
   MinLengthTask:
     class: MinLengthTaskFactory
     config:
       conditional: true
       inputs: [input_data]
       outputs: [output_data]
And how all of these nodes should be connected is defined in the edges part.
edges:
   - source: MinLengthTask
     destinations: [AbortTask, DoneTask]
We want to add a node that is called DescartesMotionPlannerTask of class DescartesFMotionPlannerTaskFactory. Everything else should look like the MinLengthTask block, except we will add one additional required field format_result_as_input under config, which will be set to false and for inputs: we’re going to put [output_data] because we want the input of Descartes to take the output of the previous task. From here on all our inputs and outputs will just be [output_data]. The new nodes structure should look like this:
nodes:
   DoneTask:
     class: DoneTaskFactory
     config:
       conditional: false
   AbortTask:
     class: AbortTaskFactory
     config:
       conditional: false
   MinLengthTask:
     class: MinLengthTaskFactory
     config:
       conditional: true
       inputs: [input_data]
       outputs: [output_data]
   DescartesMotionPlannerTask:
     class: DescartesFMotionPlannerTaskFactory
     config:
       conditional: true
       inputs: [output_data]
       outputs: [output_data]
       format_result_as_input: false
Once you’ve updated the nodes you need to update the edges. to account for this new task. The edges should look like this:
edges:
   - source: MinLengthTask
     destinations: [AbortTask, DescartesMotionPlannerTask]
   - source: DescartesMotionPlannerTask
     destinations: [AbortTask, DoneTask]
Note
In YAML files whitespace matters, so be very careful when adding to this document as it is easy to make mistakes if tabs don’t perfectly align.
Now save this file and trying runnining a motion plan again!
Note
If you built with --symlink-install you don’t need to rebuild, but if not you need to rebuild your workspace every time you make a change to this file
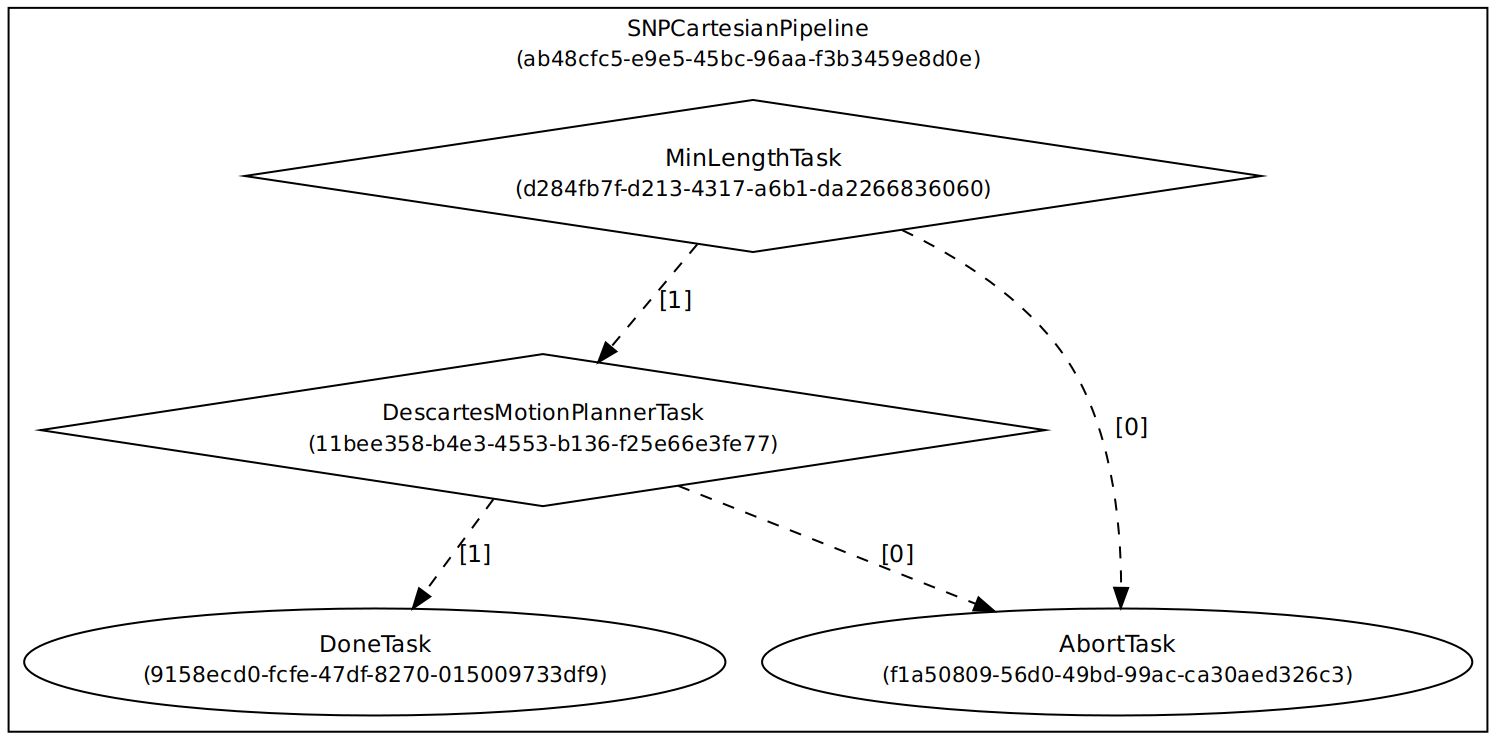
You should notice a difference in the planned motion with slightly more consistent joint motions with a given raster and if you look at /tmp/SNPCartesianPipeline.dot you should see this:
Now the process motions look better, but the freespaces and transitions are still just doing joint interpolation. Let’s fix that by incorporating OMPL.
Add OMPL to the Pipeline
Just like we added Descartes to SNPCartesianPipeline we will add OMPL to SNPFreespacePipeline and SNPTransitionPipeline. We’re going to call this task OMPLMotionPlannerTask and it will be of class OMPLMotionPlannerTaskFactory.
Note
You can name the tasks whatever you want we just chose OMPLMotionPlannerTask because it is clear. Make sure your task name matches what you put in edges. However, the class name must strictly match the generated plugins.
By following the same process as Descartes go ahead and try to add OMPL to your Freespace and Transition pipelines.
Add OMPL to Pipelines Solution Spoiler
SNPFreespacePipeline:
  class: GraphTaskFactory
  config:
    inputs: [input_data]
    outputs: [output_data]
    nodes:
      DoneTask:
        class: DoneTaskFactory
        config:
          conditional: false
      AbortTask:
        class: AbortTaskFactory
        config:
          conditional: false
      MinLengthTask:
        class: MinLengthTaskFactory
        config:
          conditional: true
          inputs: [input_data]
          outputs: [output_data]
      OMPLMotionPlannerTask:
        class: OMPLMotionPlannerTaskFactory
        config:
          conditional: true
          inputs: [output_data]
          outputs: [output_data]
          format_result_as_input: false
    edges:
      - source: MinLengthTask
        destinations: [AbortTask, OMPLMotionPlannerTask]
      - source: OMPLMotionPlannerTask
        destinations: [AbortTask, DoneTask]
    terminals: [AbortTask, DoneTask]
Note
If you’re having problems successfully running try and look at /tmp/ScanNPlanPipelineResults.dot for help in debugging what’s going wrong. You might find that your from_start or to_end motions are failing. This is a common issue people run into because they don’t realize the start state of the robot is actually in collision. You can move the robot out of collision with the joint_state_publisher_gui widget that should be floating around your screen somewhere.
Now your motion planner is using both Descartes and OMPL to intelligently plan motions!
Feel free to try to move the start position around and see if you can give it slightly more complicated motions to force OMPL to move in a way other than just a joint interpolation.
Add Time Parameterization and Collision Checking to the Pipelines
You might have started to notice that all the motions you’re trying to preview seem to move really slow. This is because we haven’t done any time parameterization. By default Tesseract just assigns 1 second jumps in time between adjacent states, meaning a trajectory with 60 states is going to take a full minute to execute. Let’s resolve this by adding a time parameterization to each of the 3 pipelines we’ve been modifying.
After Descartes in the Cartesian pipeline and after OMPL in the Transition and Freespace pipelines add a task called IterativeSplineParameterizationTask of class IterativeSplineParameterizationTaskFactory. This task does not take the field format_result_as_input.
Add Time Parameterization to Pipelines Solution Spoiler
SNPCartesianPipeline:
  class: GraphTaskFactory
  config:
    inputs: [input_data]
    outputs: [output_data]
    nodes:
      DoneTask:
        class: DoneTaskFactory
        config:
          conditional: false
      AbortTask:
        class: AbortTaskFactory
        config:
          conditional: false
      MinLengthTask:
        class: MinLengthTaskFactory
        config:
          conditional: true
          inputs: [input_data]
          outputs: [output_data]
          format_result_as_input: false
      DescartesMotionPlannerTask:
        class: DescartesFMotionPlannerTaskFactory
        config:
          conditional: true
          inputs: [output_data]
          outputs: [output_data]
          format_result_as_input: false
      IterativeSplineParameterizationTask:
        class: IterativeSplineParameterizationTaskFactory
        config:
          conditional: true
          inputs: [output_data]
          outputs: [output_data]
    edges:
      - source: MinLengthTask
        destinations: [AbortTask, DescartesMotionPlannerTask]
      - source: DescartesMotionPlannerTask
        destinations: [AbortTask, IterativeSplineParameterizationTask]
      - source: IterativeSplineParameterizationTask
        destinations: [AbortTask, DoneTask]
    terminals: [AbortTask, DoneTask]
Once you’ve properly done this you should have much smoother and more timely trajectories planning.
Now you have trajectories being produced that SHOULD always be collision free, but sometimes things slip through. Let’s add a contact checker to make sure each of our pipelines are outputting safe trajectories. Add a DiscreteContactCheckTask of class DiscreteContactCheckTaskFactory just before the IterativeSplineParameterizationTask in each of the 3 pipelines we’ve been modifying. (Again this is without the fromat_result_as_input field)
Add Contact Checking to Pipelines Solution Spoiler
SNPCartesianPipeline:
  class: GraphTaskFactory
  config:
    inputs: [input_data]
    outputs: [output_data]
    nodes:
      DoneTask:
        class: DoneTaskFactory
        config:
          conditional: false
      AbortTask:
        class: AbortTaskFactory
        config:
          conditional: false
      MinLengthTask:
        class: MinLengthTaskFactory
        config:
          conditional: true
          inputs: [input_data]
          outputs: [output_data]
          format_result_as_input: false
      DescartesMotionPlannerTask:
        class: DescartesFMotionPlannerTaskFactory
        config:
          conditional: true
          inputs: [output_data]
          outputs: [output_data]
          format_result_as_input: false
      DiscreteContactCheckTask:
        class: DiscreteContactCheckTaskFactory
        config:
          conditional: true
          inputs: [output_data]
          outputs: [output_data]
      IterativeSplineParameterizationTask:
        class: IterativeSplineParameterizationTaskFactory
        config:
          conditional: true
          inputs: [output_data]
          outputs: [output_data]
    edges:
      - source: MinLengthTask
        destinations: [AbortTask, DescartesMotionPlannerTask]
      - source: DescartesMotionPlannerTask
        destinations: [AbortTask, DiscreteContactCheckTask]
      - source: DiscreteContactCheckTask
        destinations: [AbortTask, IterativeSplineParameterizationTask]
      - source: IterativeSplineParameterizationTask
        destinations: [AbortTask, DoneTask]
    terminals: [AbortTask, DoneTask]
Congratulations! You now have a fully functional planning pipeline that can solve a wide range of planning applications. Continue on in this exercise to make this planning pipeline more robust.
Running Descartes Globally
You might have noticed that often your robot seems to be doing odd jumps between rasters that seem unnecessary to you. You’re right, these are unnecessary, but as of now your pipeline is dictacting that Descartes is used to find the optimal path on each raster by itself, it doesn’t take all the waypoints into consideration. To address this we’re going to modify the fourth and final pipeline that we’ve yet to touch, SNPPipeline. This pipeline is the toplevel pipeline that can see every waypoint throughout our process.
As of right now our SNPPipeline looks like this:
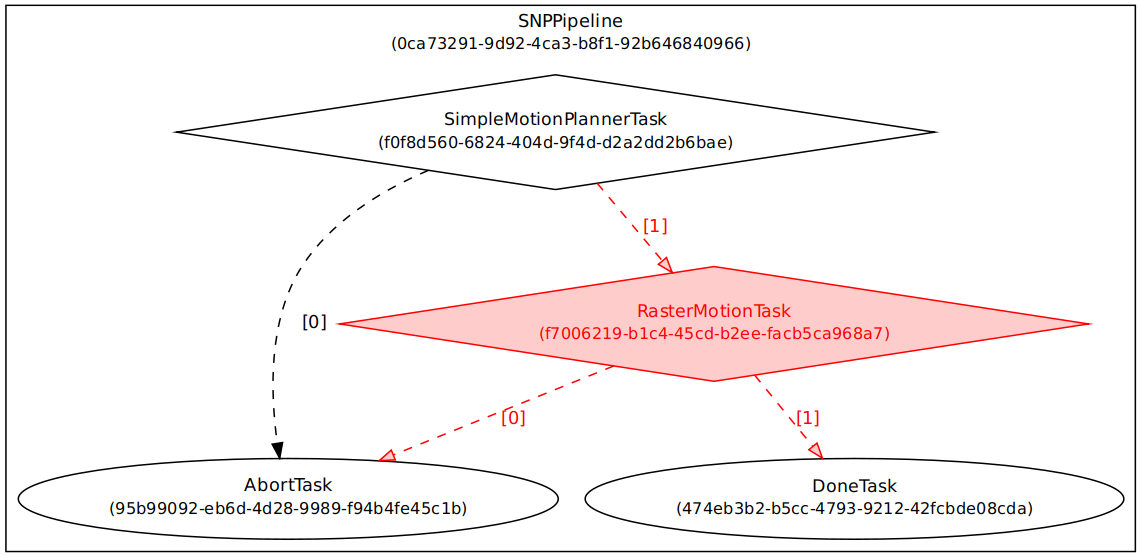
The highlighted node is where all the Cartesian, transition and freespace plans occur. More detail of this graph can be found in the /tmp/ScanNPlanPipelineResults.dot, an example of which is shown here:
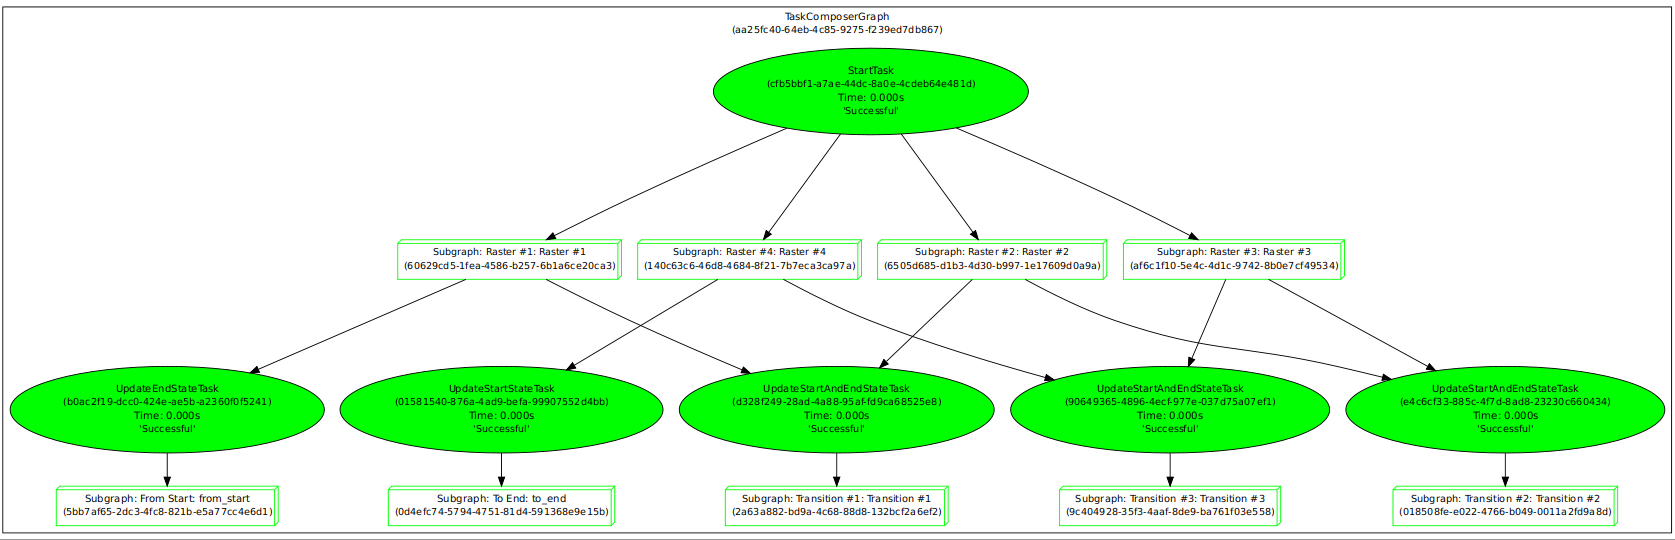
By adding a Descartes step before the RasterMotionTask we can actually generate joint states before any of the other pipelines are run. Then when we get to the Cartesian pipelines it will already have joint solutions, so actually we’ll be able to remove the Descartes steps from there.
The new SNPPipeline with Descartes added should now look like this:
SNPPipeline:
  class: GraphTaskFactory
  config:
    inputs: [input_data]
    outputs: [output_data]
    nodes:
      DoneTask:
        class: DoneTaskFactory
        config:
          conditional: false
      AbortTask:
        class: AbortTaskFactory
        config:
          conditional: false
      SimpleMotionPlannerTask:
        class: SimpleMotionPlannerTaskFactory
        config:
          conditional: true
          inputs: [input_data]
          outputs: [output_data]
          format_result_as_input: true
      DescartesMotionPlannerTask:
        class: DescartesFMotionPlannerTaskFactory
        config:
          conditional: true
          inputs: [output_data]
          outputs: [output_data]
          format_result_as_input: true
      RasterMotionTask:
        class: RasterMotionTaskFactory
        config:
          conditional: true
          inputs: [output_data]
          outputs: [output_data]
          freespace:
            task: SNPFreespacePipeline
            config:
              input_remapping:
                input_data: output_data
              output_remapping:
                output_data: output_data
              input_indexing: [output_data]
              output_indexing: [output_data]
          raster:
            task: SNPCartesianPipeline
            config:
              input_remapping:
                input_data: output_data
              output_remapping:
                output_data: output_data
              input_indexing: [output_data]
              output_indexing: [output_data]
          transition:
            task: SNPTransitionPipeline
            config:
              input_remapping:
                input_data: output_data
              output_remapping:
                output_data: output_data
              input_indexing: [output_data]
              output_indexing: [output_data]
    edges:
      - source: SimpleMotionPlannerTask
        destinations: [AbortTask, DescartesMotionPlannerTask]
      - source: DescartesMotionPlannerTask
        destinations: [AbortTask, RasterMotionTask]
      - source: RasterMotionTask
        destinations: [AbortTask, DoneTask]
    terminals: [AbortTask, DoneTask]
Running the application with this latest pipeline should result in the best trajectory you’ve seen up to this point. There should be much less motion between rasters as they have been globally optimized together.
Modifying the Descartes Profile
Up to this point we’ve only modified the pipeline by modifying a single yaml file. That will change in this step as we start to get into the weeds to the parameters of all these planners.
Open up the file snp_motion_planning/src/planner_profiles.hpp. You’ll see several sections where we are going to put code. Right now focus on the section that looks like:
/* =======================
 * Fill Code: DESCARTES
 * =======================*/
It’s here that we’re going to implement a custom profile for the Descartes step in our planner.
One capability of Descartes is the ability to sample waypoints. For our application we are using a circular tool where orientation around the tool-z does not matter. This means we are only constrained on 5 degrees of freedom and can freely rotate around the z-axis. Replace this fill code comment with the following code:
profile->num_threads = static_cast<int>(std::thread::hardware_concurrency());

profile->target_pose_sampler =
    std::bind(tesseract_planning::sampleToolZAxis, std::placeholders::_1, 30.0 * M_PI / 180.0);
This does 2 things:
Allows more use of your computer’s capabilities by running with multiple threads (here it is set to the number of available threads on your system)
Samples each waypoint at 30 degree increments around the z-axis. This will alllow for more optimal trajectories while still reaching all the waypoints.
Rebuild your workspace and relaunch your application to test this out. You should notice a slightly smoother trajectory. Feel free to play with the sampling step size, the smaller the step size the more samples which leads to longer planning times, but potentially better solutions.
Note
Unlike the yaml file, every time you modify this
.hppfile you will have to rebuild and relaunch your application.
Modifying the OMPL Profile
Just like we improved Descartes we can improve OMPL through a custom profile. Copy and past the following code into your OMPL fill code section:
// Give OMPL 15 seconds to plan
profile->planning_time = 15.0;

// Clear existing planners
profile->planners.clear();

// Add an RRTConnect planner with a small step size for small motions
auto rrt_connect_small = std::make_shared<tesseract_planning::RRTConnectConfigurator>();
rrt_connect_small->range = 0.05;
profile->planners.push_back(rrt_connect_small);

// Add an RRTConnect planner with a large step size for large motions
auto rrt_connect_large = std::make_shared<tesseract_planning::RRTConnectConfigurator>();
rrt_connect_large->range = 0.25;
profile->planners.push_back(rrt_connect_large);
The comments here do a pretty good job of explaining what is happening. We are modifying the allowed planning time and then replacing the default planners (RRT) with 2 RRTConnect planners that each run in their own thread trying to find a solution. With RRTConnect you might notice your freespace and transition motions look much smoother, this is from RRTConnect’s algorithm planning from the start and goal simultaneously.
Feel free to explore other OMPL planners available in Tesseract which can be found in tesseract_motion_planners/include/tesseract_motion_planners/ompl/ompl_planner_configurator.h.
Adding TrajOpt
First we’re going to go back to the yaml file where we’ll add a TrajOpt task to the Cartesian, freespace and transition pipeline. The task should be called TrajOptMotionPlannerTask and of class TrajOptMotionPlannerTaskFactory (with format_result_as_input: false). In the Cartesian pipeline this should replace the DescartesMotionPlannerTask and for the freespace and transition pipelines immediately following OMPLMotionPlannerTask.
TrajOpt Added to Cartesian Pipeline Solution Spoiler
SNPCartesianPipeline:
  class: GraphTaskFactory
  config:
    inputs: [input_data]
    outputs: [output_data]
    nodes:
      DoneTask:
        class: DoneTaskFactory
        config:
          conditional: false
      AbortTask:
        class: AbortTaskFactory
        config:
          conditional: false
      MinLengthTask:
        class: MinLengthTaskFactory
        config:
          conditional: true
          inputs: [input_data]
          outputs: [output_data]
          format_result_as_input: false
      TrajOptMotionPlannerTask:
        class: TrajOptMotionPlannerTaskFactory
        config:
          conditional: true
          inputs: [output_data]
          outputs: [output_data]
          format_result_as_input: false
      DiscreteContactCheckTask:
        class: DiscreteContactCheckTaskFactory
        config:
          conditional: true
          inputs: [output_data]
          outputs: [output_data]
      IterativeSplineParameterizationTask:
        class: IterativeSplineParameterizationTaskFactory
        config:
          conditional: true
          inputs: [output_data]
          outputs: [output_data]
    edges:
      - source: MinLengthTask
        destinations: [AbortTask, TrajOptMotionPlannerTask]
      - source: TrajOptMotionPlannerTask
        destinations: [AbortTask, DiscreteContactCheckTask]
      - source: DiscreteContactCheckTask
        destinations: [AbortTask, IterativeSplineParameterizationTask]
      - source: IterativeSplineParameterizationTask
        destinations: [AbortTask, DoneTask]
    terminals: [AbortTask, DoneTask]
TrajOpt Added to Freespace/Transition Pipeline Solution Spoiler
SNPFreespacePipeline:
  class: GraphTaskFactory
  config:
    inputs: [input_data]
    outputs: [output_data]
    nodes:
      DoneTask:
        class: DoneTaskFactory
        config:
          conditional: false
      AbortTask:
        class: AbortTaskFactory
        config:
          conditional: false
      MinLengthTask:
        class: MinLengthTaskFactory
        config:
          conditional: true
          inputs: [input_data]
          outputs: [output_data]
      OMPLMotionPlannerTask:
        class: OMPLMotionPlannerTaskFactory
        config:
          conditional: true
          inputs: [output_data]
          outputs: [output_data]
          format_result_as_input: false
      TrajOptMotionPlannerTask:
        class: TrajOptMotionPlannerTaskFactory
        config:
          conditional: true
          inputs: [output_data]
          outputs: [output_data]
          format_result_as_input: false
      DiscreteContactCheckTask:
        class: DiscreteContactCheckTaskFactory
        config:
          conditional: true
          inputs: [output_data]
          outputs: [output_data]
      IterativeSplineParameterizationTask:
        class: IterativeSplineParameterizationTaskFactory
        config:
          conditional: true
          inputs: [output_data]
          outputs: [output_data]
    edges:
      - source: MinLengthTask
        destinations: [AbortTask, OMPLMotionPlannerTask]
      - source: OMPLMotionPlannerTask
        destinations: [AbortTask, TrajOptMotionPlannerTask]
      - source: TrajOptMotionPlannerTask
        destinations: [AbortTask, DiscreteContactCheckTask]
      - source: DiscreteContactCheckTask
        destinations: [AbortTask, IterativeSplineParameterizationTask]
      - source: IterativeSplineParameterizationTask
        destinations: [AbortTask, DoneTask]
    terminals: [AbortTask, DoneTask]
On top of adding this to the pipelines we are going to set up a profile for TrajOpt. TrajOpt is unique in that it has multiple profiles to set it up. Today we will be going over 2 of the 3. The TrajOptPlanProfile deals with waypoint level optimization and the TrajOptCompositeProfile deals with trajectory level optimization.
Replace
/* =======================
 * Fill Code: TRAJOPT PLAN
 * =======================*/
with the following:
profile->cartesian_coeff = Eigen::VectorXd::Constant(6, 1, 5.0);
profile->cartesian_coeff(5) = 0.0;
This tells TrajOpt that Cartesian waypoints all must be followed with a cost of 5.0 in all dimensions except for rotation about Z, which we set to 0.0. This is critical because in our application we can freely rotate around Z and we previously configured Descartes to do just this. If we enforced a cost on rotation about Z then TrajOpt could potentially undermine the results from Descartes.
Next replace the TrajOpt composite section with:
profile->smooth_velocities = true;
profile->velocity_coeff = Eigen::VectorXd::Constant(6, 1, 10.0);
profile->acceleration_coeff = Eigen::VectorXd::Constant(6, 1, 25.0);
profile->jerk_coeff = Eigen::VectorXd::Constant(6, 1, 50.0);

profile->collision_cost_config.enabled = true;
profile->collision_cost_config.type = trajopt::CollisionEvaluatorType::DISCRETE_CONTINUOUS;
profile->collision_cost_config.safety_margin = 0.010;
profile->collision_cost_config.safety_margin_buffer = 0.010;
profile->collision_cost_config.coeff = 10.0;

profile->collision_constraint_config.enabled = false;
This will enforce smoothing of the motion and set the collision avoidance parameters.
Now rebuild and run your application. You should see very smooth motions throughout the whole process.
Congratulations! You have made a robust planner ready for all sorts of environments.
Bonus Material
Continue on if you want to further improve your planning pipelines
Add Custom Tasks to Your Pipelines
In this repo we’ve also created our own custom tasks which can be found in the snp_motion_planning/src/plugins/tasks directory. These classes are called ConstantTCPSpeedTimeParameterizationTaskFactory and KinematicLimitsCheckTaskFactory.
We often want to have a constant TCP speed when performing processes on the surface. In our application with is usually during Cartesian and transition motions. Try replacing IterativeSplineParameterizationTask with a task using the class ConstantTCPSpeedTimeParameterizationTaskFactory in the Cartesian and transition pipeline.
Also, it’s always good to make sure you’re staying inside all your kinematic limits. Try adding a task using the class KinematicLimitsCheckTaskFactory to the end of each of the Cartesian, transition, and freespace pipelines.
Example Cartesian Pipeline Solution Spoiler
SNPCartesianPipeline:
  class: GraphTaskFactory
  config:
    inputs: [input_data]
    outputs: [output_data]
    nodes:
      DoneTask:
        class: DoneTaskFactory
        config:
          conditional: false
      AbortTask:
        class: AbortTaskFactory
        config:
          conditional: false
      MinLengthTask:
        class: MinLengthTaskFactory
        config:
          conditional: true
          inputs: [input_data]
          outputs: [output_data]
          format_result_as_input: false
      TrajOptMotionPlannerTask:
        class: TrajOptMotionPlannerTaskFactory
        config:
          conditional: true
          inputs: [output_data]
          outputs: [output_data]
          format_result_as_input: false
      DiscreteContactCheckTask:
        class: DiscreteContactCheckTaskFactory
        config:
          conditional: true
          inputs: [output_data]
          outputs: [output_data]
      ConstantTCPSpeedTimeParameterizationTask:
        class: ConstantTCPSpeedTimeParameterizationTaskFactory
        config:
          conditional: true
          inputs: [output_data]
          outputs: [output_data]
      KinematicLimitsCheckTask:
        class: KinematicLimitsCheckTaskFactory
        config:
          conditional: true
          inputs: [output_data]
          outputs: [output_data]
    edges:
      - source: MinLengthTask
        destinations: [AbortTask, TrajOptMotionPlannerTask]
      - source: TrajOptMotionPlannerTask
        destinations: [AbortTask, DiscreteContactCheckTask]
      - source: DiscreteContactCheckTask
        destinations: [AbortTask, ConstantTCPSpeedTimeParameterizationTask]
      - source: ConstantTCPSpeedTimeParameterizationTask
        destinations: [AbortTask, KinematicLimitsCheckTask]
      - source: KinematicLimitsCheckTask
        destinations: [AbortTask, DoneTask]
    terminals: [AbortTask, DoneTask]
When running your application with these changes you should notice nice smooth motions and constant speeds on the surface.
CHALLENGE
Try and recreate the transition pipeline seen here:
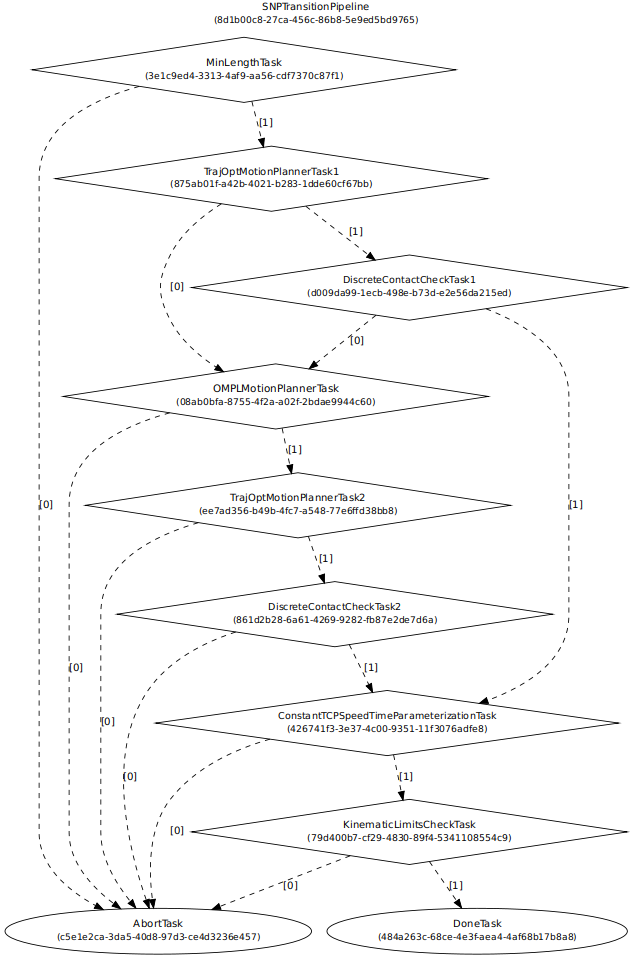
This pipeline will first try and do a TrajOpt solve for transitions because most of the time OMPL is going to be overkill for these small motions.
You’ll have to figure this one out on your own as there is no solution posted for it.
Hint
Tasks names have to be unique, but are arbitrary.
Want to do More?
Try modifying parameters in the
snp_tpp_appwidget to see how different settings effect the generated toolpath and your resulting motion plans.Try to make your own custom pipeline not mentioned here.